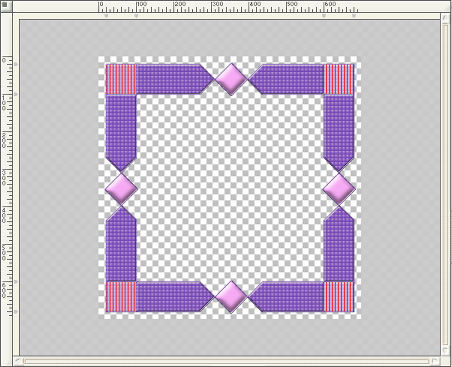
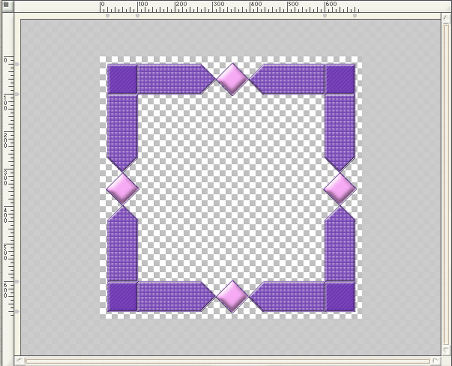
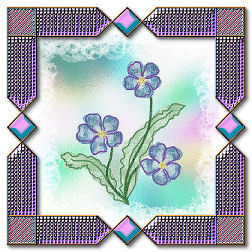
title image

Puzzle Frame

image

This tutorial was created 5th April 2009 ©Copyright Artwork by EssexGirl
please do not copy it, or put it anywhere else without my written permission.

Updated for AV Bros Puzzle Pro version 3.0 on the 14th November 2009
Puzzle Pro version 3.1 also works with this tutorial

Filters and programs used in this tutorial :-
Paint Shop Pro
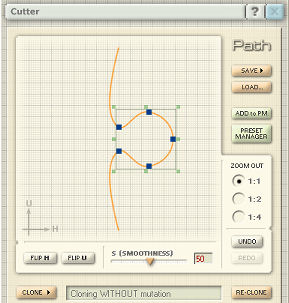
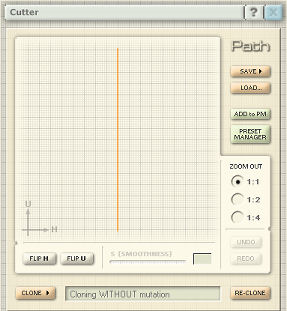
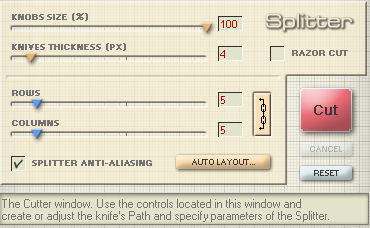
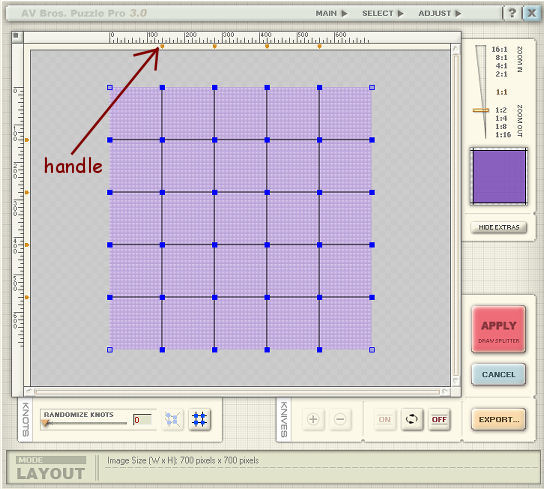
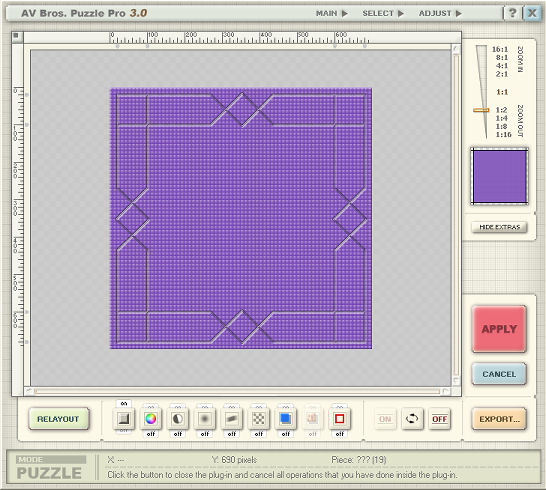
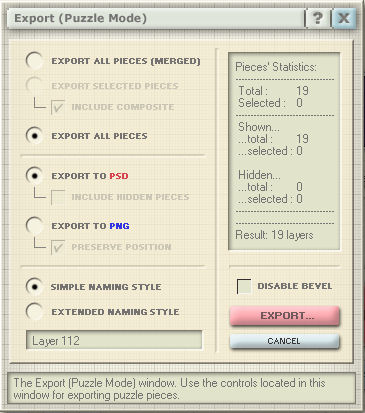
AV Bros Puzzle Pro 3.0 or 3.1

Materials :-
The 4365769.bmp (gold pattern) that goes with the sculpture setting
on page 2 here (I think this came from an earlier version of psp, so you
may already have it, if you haven't, put it into PSP's patterns folder).

Images have been made smaller to shorten file size
and in some cases only show part of the image.


Step 1.
Open a new image 700 X 700
Flood fill with a colour of your choice. I used #cab4e3
Go to Effect...Texture Effects...Blinds...
Width = 10
Opacity = 100
Colour = A dark shade of your chosen colour. I used #7646b4
Horizontal = ticked
Light from left/top = ticked
Repeat the blinds effect with the 'Horizontal' box unticked

Go to Effects...Plugins...AV Bros...AV Bros Puzzle Pro

The main window is in Layout mode.
First we will work in the Cutter window.
In the Path section at the top of the Cutter you will see the current
shape (you may not have the same one that is showing in my screenshot).
We are going to start by removing this and starting with a straight line.
All the nodes should be selected and the shape should have a green
bounding box around it. If it isn't selected, right click somewhere o
the grid and choose Select All (or Ctrl+A)

image

Right click on the grid and choose Delete.
You should now have a straight line

image


Step 2.
In the Splitter section of the Cutter use these settings:-
Razor Cut = unticked
Knives Thickness = 4
Knob size = it doesn't matter, as there are no knobs at the moment.
Rows = 5
Columns = 5
Splitter Anti-aliasing = Ticked

Don't press the Cut button yet, we need to work in
the main window while it is in Layout mode first.

image


Step 3.
On the main window you will have 4 horizontal and vertical
lines which split up your 5 columns and rows. Above and along
the left side of these is a ruler and a handle for each line.

image

Drag the handles along both the top and side rulers to 20, 100,
600, and 680. To make it easier to position them accurately, you
can zoom in and use the scrollbars to scroll across the image, or
watch the position co-ordinates at the bottom left of the screen.

image

image

When the lines are in position your image should look like this screenshot

image


Step 4.
Hold down the Ctrl key and select the 8 long lines,
as shown in this screenshot

image

Go back to the Cutter window and in the Path section click the
Preset Manager button.

image

The Preset Manager will show a list of the currently available
presets and icons showing their shapes. The preset that I used in
this tutorial is called Triangle 2. If you can't see it you will
need to load it (feel free to experiment with other shapes).
Click on the Replace Set, or Load Set button (the first will replace
the current set with a new one, the second will add the new set to
those currently available.

Navigate to the AV Bros Puzzle Pro 3.0/shapes sets folder.
The set containing Triangle 2 is called Simple Plane Geometry.avpk
that's the set we want to load

image

Click the 'Choose Path' button.
Your shape in the main window should now look like this.

image

The shape is larger than we need and some points go over the
edge of the image, so we will make some adjustments.


Step 5.
You can stretch or shrink the shape by dragging the nodes of
the bounding box around the shape in the Cutter window.

I kept the height and position of the shape the same, but made the
point narrower. Hold the mouse over the middle node on the right side
You will see a small double arrow that shows the directions that it
can be moved, click on the node and drag it towards the left until
the shape is the width that you want. Some points may still go outside
the edge of the image, but we will be flipping them soon so that's ok.

image

image


Step 6.
We are going to flip some of the lines next (the knives), but deselect
them first by clicking in an empty space in the layout window (or Ctrl+D).
Then hold down the Ctrl key and select the lines shown in red
in the following screenshot

image

Just below the shape in the cutter window you will see
2 buttons, click the Flip H button

image

Now it's beginning to look more like a frame.

image


Step 7.
Deselect (Ctrl+D)
Now hold down the Ctrl key and select all the short lines outside
of each of the corners (there are lines 4 on each corner).
Zoom in and use the scrollbars to see each corner more clearly.

image

At the bottom right of the layout window, in the knives section
click the off button. This will hide the selected knives.

image

Now click the 'Cut' button (bottom right of the Cutter window)

image

The Cutter window will close and the Main window will now be in
Puzzle mode. If you want to go back to Layout mode, so that you
can make any changes, click on the 'Relayout' button (bottom left)


Step 8.
Now we are going to use some of Puzzle Pro's useful effects.
There are several ways to access the effects, you can go to
Adjust..(top right on the screen) and pick the effect you want
from the list, you can use shortcut keys, or the effects buttons
below the image. We will use these buttons
If you hold the mouse over any of the buttons, it will tell you
what the effect is at the bottom of the screen (The one that is
greyed out is Image Overlay, it can only be used in Photoshop)

image

Hold down the CTRL key and select the centre of the image
and the outside edge, as shown in the next screenshot

image

I want these parts to be made invisible.
Click on the Opacity Effect button.

image

Move the Opacity slider down to zero and click OK

image

Now deselect (Ctrl+D)

image


Step 9.
Hold down the CTRL key and select the diamond shapes at the top,
bottom and both sides. We are going to use several effects on
the diamonds, so don't deselect until I tell you to.

image

Click on the Gaussian Blur Effect button.

image

Radius=15

image

Click on the Color Overlay Effect button.

image

Click on the 'Color 1' box and choose a colour
(I used #f6aaf4 with 100% Opacity)

image

Click on the Bevel Effect button.

image

You can use a bevel of your choice, these were the settings I used
Angle=122
Highlight Opacity=90 colour=white
Altitude=27
Shadow Opacity=50 colour=black
Bevel size=12
Depth=20
Soften=4

image

Now you can deselect

image


Step 10.
Hold down the CTRL key and select the corner squares
(we will use two effects on the corners)

image

Click on the Motion Blur Effect button.

image

These were the settings I used, but you can choose your own if you wish

image

Click on the Brightness/Contrast Effect button.

image

I used these settings

image

Deselect

image


Step 11.
Hold down the CTRL key and select the panels each
side of the four diamond shapes

image

Click on the Bevel Effect button.

image

I used these settings
Angle=122
Highlight Opacity=75 colour=white
Altitude=27
Shadow Opacity=75 colour=black
Bevel size=8
Depth=8
Soften=8

image

Deselect

image


Step 12.
To finish off use the zoom, to zoom in and the scrollbars, so
that you can clearly see the outline (splitter) and select it

image

Click on the Color Overlay Effect button.

image

Choose a contrasting colour.
This time I chose white at 100% opacity

image

An interesting and useful option that Puzzle Pro has, is to save selected
pieces in .psd format, with all the pieces on separate layers. This is
actually an Adobe Photoshop format, but PSP can also open .psd files.

You can also save in .png format. This saves each part as a seperate image.
For this tutorial I saved in .psd format.

Go to Main...Export
To save as .psd use these settings
Export all Pieces
Export to PSD
Simple Naming style
Disable Bevel = Unticked

image

Click 'Export' and Navigate to where you want to save the file (I keep a
folder for images that I'm currently working on), give it a name and save.

Now Click the 'Apply' button to take your finished frame into psp.

For my title image at the beginning of the tutorial, I added
a drop shadow to the frame using these settings

Effects..3D Effects...Drop Shadow
Horizontal and Vertical Offsets = 5
Opacity = 50
Blur = 10
Colour = Black
Shadow on new layer ticked

Then I added an image on a new layer and dragged it
below the frame and shadow layers in the layers palette.


Go to Page 2 and we'll open the .psd file and work on that. Click Here

This is what we'll be doing to the frame

image


If you wish to contact me you can find an email address to use included on my Site Map

Home