title image

I'll Keep a Candle Burning

PSP X8

image
This tutorial was created July 21st 2008, re-written and updated 29th April 2016
© Artwork by EssexGirl
please do not copy it, or put it anywhere else without my written permission.

Filters and programs used in this tutorial :-
Paint Shop Pro
Animation shop
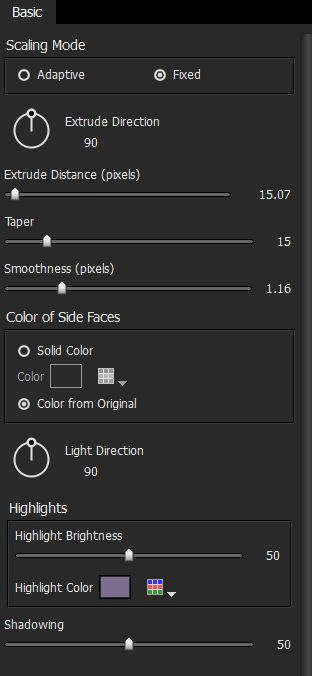
Alien Skin Eye Candy 7 (or Eye Candy 5 Impact)
(if you haven't got Eye Candy there is a selection
file in the materials zip you can use instead).

Materials :-
Font of your choice, I used Angelina available from DaFont
Woman tube of your choice
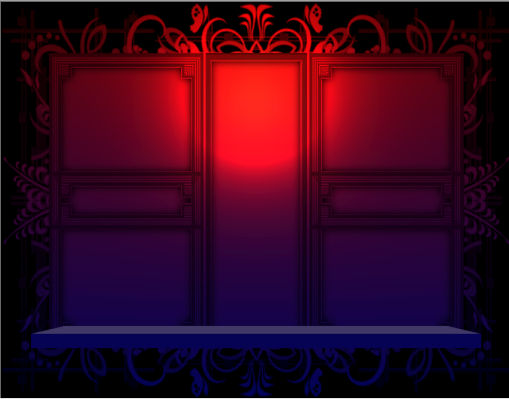
Flower arrangement, Candle and Flame tubes, Mask, Lights Preset and Selection file Materials
Put the mask in your mask folder
The Lights Sunset preset that I used is from psp8, put it in the My PSP Files/Presets folder
Selection file goes in your selections folder (you only need this if you haven't got Eye Candy).
The tubes can be opened in PSP when you need them.

some images have been made smaller to shorten file size


Step 1.
This tutorial is in two parts.
The first part is making an animated candle.
Go to This Page and follow the tutorial up to the end of step 8
you will then find a link to return to this page

Minimise the candle you have made, so it is out of the way for now.
We will be needing it later in the tutorial.


step 2.
Open a new image 850 x 640
Make the Foreground and stroke properties on your palette=Gradient
Gradient=Foreground-background
Style=Linear
Angle=0
Repeats=0
Invert=unticked
Foreground colour=#0910e1
Background colour=#f80c10

Flood fill your image with the gradient
(Feel free to experiment with different colours both here and
in the colour of the lights we will be adding in the next step)


Step 3.
Go to Effects...Illumination Effects...Lights...
From the dropdown list of presets at the top, choose Sunset

image


Step 4.
Add a new raster layer. Change the foreground of your palette to
Color Black and flood fill the layer
Go to Layers...Load/Save mask...Load Mask from Disk...
Choose the sg_multi-floral-grungeframe4 mask
Create mask from = Source luminance
Orientation = Fit to canvas Options:-
Invert tranparency= unticked
Hide all mask

Go to Layers..Merge..Merge Group...

image


Step 5.
With the Magic Wand and holding down the Shift key select the 7
spaces in the middle of the masked area, see the screenshot below

image

Go to Effects...3D Effects...Cutout...
Use these settings Vertical and Horizontal=0
Opacity=100
Blur=20
Shadow colour=Black
Fill interior with colour = unticked
Select None

Go to Layers... Merge... Merge Down...


Step 6.
Next we will add a shelf at the bottom of the window so that
we will have something to put our candle on.
Add a new Raster Layer
Activate the Selection Tool and click on the Custom Selection
icon on the toolbar. Use these settings
Top = 555
Left = 50
Right = 800
Bottom = 575

Change the foreground colour of your palette to the colour
you want the front of your shelf to be. I picked a dark blue
from near the bottom of my image (#080655). Flood fill the selection.

To make the top of the shelf go to
Effects... Plugins... I used Alien Skin Eye Candy 7 Extrude,
but you can use Eye Candy 5 Impact Extrude with the same settings

image

(If you haven't got either of these programs you can use the
Selection file included in the Materials zip, go to Selections...
Load/Save Selection...Load Selection from Disk...load the
sg_candle-shelf-top selection and flood fill with #7d6f90)

image


Step 7.
Open the woman tube that you want to use.
Go to Edit...Copy... you can close the tube now.
On your main image Go to Edit...Paste as a new layer and
resize if necesary, then move into position using the Mover Tool

image

Go to Effects... 3D Effects... Drop Shadow...
Vertical = -10 (minus 5)
Horizontal = 15
Opacity = 35
Blur = 10
Colour = Black


Step 8.
To make it easy to see the space you have for your text,
we'll add a temporary candle on the image, which
can be deleted when your text is in place

Open up the candle that you minimised earlier
Go to Edit...Copy... (it doesn't matter which layer, you only need 1)
The candle image can now be closed.

Paste as a new layer on your image. It will be too large, so go to
Image... Resize... I resized by 80% if you want your candle larger,
or smaller, you can adjust the amount you resize, but make a note of
the percentage you use, because you will need to resize the candle by
the same amount when we go into Animation Shop. Move it on to the shelf
in the position that you will want the animated candle to be.
This is where I placed mine

image

Now that you can see where the spaces are, you can add your text.
I like to create text as Vector, then convert it to raster when
I've finished, but you can create it whatever way you prefer to

For my text colour, I used a very light pink #efd7d5 as the
background on my palette and made the foreground transparent
The font I used is called Angelina. Each line of my text was done
separately, as it made it easier to move them around.

Add a drop shadow to your text, the settings I used are
Vertical=minus 2 (-2)
Horizontal=2
Opacity=75
Blur=5
Colour-Black

image

Now that your text is in place you can delete the candle, so
Go to the layer that you put the candle on and delete it

Go to Layers...Merge...Merge All...


Step 9.
This step is optional, if you want a border around your image
go to Image...Add Borders...
The width is your choice, I used 5 pixels
Click on the colour box and pick a colour from your image.

Go to Layer... Duplicate... three times, so that you have 4 layers
(the same number of layers as the candle).
Save your image in the same folder that you saved your candle


Step 10.
Open Animation Shop
Go to File...Browse... (or Open...)
Navigate to the folder you saved your images in and open both
the large image that you made and the candle animation

The candle needs to be resized, you made a note of the percentage
you resized the temporary candle layer, before the text was added
to your image and the candle should be resized by the same amount.
Go to Animation... Resize Animation... In the percentage of Original
section put the amount of resize you need mine was resized by 80%

Now we are ready to put your image and candle together.
The candle should have 4 frames, we need to select them all and copy them
Edit...Select All (Ctrl+A)
Edit...Copy
You can close the candle animation now. Animation Shop will probably
ask if you want to save the changes, say no


Step 11.
Go to Edit... select All...
The image should have 4 frames which are all selected

Go to Edit...Paste into Selected Frame...
Position your candle where you want it in frame 1,
when you click it into place the candle animation
will appear in all your frames

To view your animation go to
View...Animation ...

Depending on whether you want to use the animation as a tag,
or for stationery, you may, or may not want to resize it
If you want to make the animation smaller go to
Animation...Resize Animation...


To see my other tutorials click Here

I hope you enjoyed this tutorial.
To see my other tutorials click Here

If you wish to contact me you can find an email address to use included on my Site Map

Home