title image

Sweetheart Wave Tag

image

This tutorial was written February 5th 2006
by Sandie © Artwork by EssexGirl, All Rights Reserved.
please do not copy it, or put it anywhere else without my written permission. rewritten for PSP2018

Filters and programs used in this tutorial :-
Paint Shop Pro
Mura Meister Copies
Solidify from Flaming Pear
DSB Flux
Graphics Plus Pool Shadow

Materials :-
My sg_tiny-heart tube and WordArt tube Here Put into PSP's tubes folder
A tube of your choice.



Step 1.
Go to File...New...and open a new image
Width=800
Height=600
Raster Background
Transparent

Open your tube in psp, go to Edit...Copy...
You can close the tube now.

Go to Edit...Paste as New Layer. Rename the layer 'tube'.
Depending on the size of your tube this layer may need
to be resized. If your tube is too large, go to
Image...Resize...Resample using Bicubic,
make sure the all layers box is unticked.
The amount of resizing will depend on the size of your tube
Use the the Mover Tool to move the tube into position near the
bottom of the image, you can use my next screenshot as a rough guide.

image


Step 2.
Go to Layers...Duplicate...Rename this layer 'coloured bg'
Go to Effects...Plugins...Flaming Pear...Solidify, or Solidify B...
(Solidify B will give a wider range and expanse of colours, Solidify is
more muted. I've used Solidify B for this example

Your tube will be hidden by this layer for now, we will rearrange the
layers so your tube is visible when we have finished with this background).

Go to Adjust...Blur...Gaussian Blur...
Radius=25

Next go to Effects...Plugins...dsb flux...Blast...
Direction=Left
Percentage=30
Repeat the dsb flux Blast changing the direction to Right,
repeat again changing it to Upwards, then once more changing
it to Downwards.

Yours won't be exactly like mine, the colours and the amount of
colour will depend on your tube and which Solidify effect you used.
You should have something similar to this

image

Open the layers palette and drag this layer below
the 'tube' layer (or go to Layers..Arrange..Move Down..)

image


Step 3.
The'coloured bg' layer should still be the active layer.
Activate the Selection Tool
Selection type=Rectangle
mode=Replace
feather=0
antialias=ticked
Drag the selection around approximately the bottom quarter of the image

image

Go to Image...Blur...Gaussian Blur...
Use Radius=5

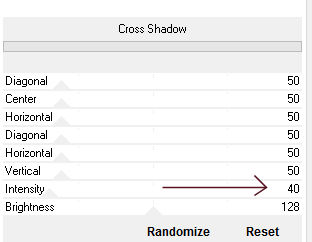
Then go to Effects...Plugins...Graphics Plus...Pool Shadow...
Move the Intensity down to 40 leave the rest at the default settings

image

Select None

image


Step 4.
Make the 'tube' layer active and apply a drop shadow
using these settings
Vertical and Horizontal= -10 (minus 10)
Opacity=40
Blur=20

Open the sg_tiny-heart tube.
You can change the colour of this to suit your image
Go to Adjust...Hue and Saturation..Colourize...
Move the sliders to find a colour and saturation
level that you think goes with your image

Go to Edit...Copy...You can close the tube now.
On your main image go to Edit...Paste as New Layer
Rename the layer 'heart wave'.


Step 5.
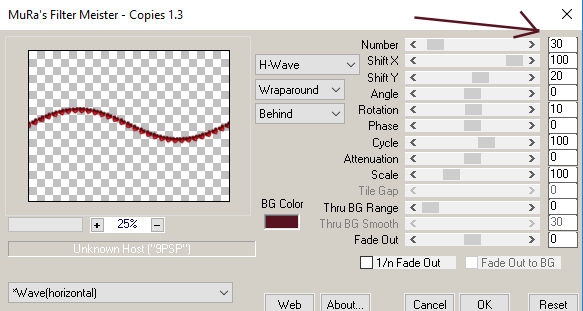
Go to Effects...Plugins...Mura Meister...Copies...
In the dropdown list of presets choose Wave (horizontal)
and change the 'Number' to 30

image

I wanted to move the wavy line of heart up a little, but you
can leave it where it is if you prefer

Go to Effects...Image Effects... Offset...
Horizontal=0
Vertical=110 (this is the number I used, you can make it more
or less, if you want your wave higher, or lower on the image)

image

Open the layers palette and drag this layer below
the 'tube' layer


Step 6.
Use the Dropper Tool to pick a colour from the wave of hearts
Go to layers...New Raster Layer...name the layer 'border'
Flood fill with the colour you picked
Go to Selections...Select All...
Selections...Modify...Contract...
Contract by 6 pixels, then hit the delete button on the keyboard
Select None

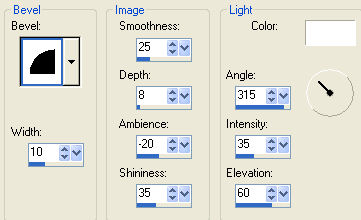
Go to Effects...3D Effects...Inner Bevel...
use these settings

bevel=1, width=10, smoothness=25, depth=8, ambience=-20, Shininess=35, angle=315, intensity=35, elevation=60, colour=white


Step 7.
Make the 'heart wave' layer active
With the magic wand
Mode=Replace
Match mode=RGB Value
Tolerance=0
Use all layers=unticked
Contiguous=-ticked
Feather=0
Antialias=ticked
Outside
Click on the area above the heart wave
(Alternatively you could use the Freehand Selection Tool...
Point to point... to select the area above the wave).
Go to Selections...Modify...Expand...
expand the selection by 1 pixel

Make the 'coloured bg' layer active and hit the delete key.
Make the 'border' layer active and hit the delete key.
Select None.

image


Step 8.
On the layers palette check that the 'heart wave' layer
is just above the 'border' layer, make the 'heart wave'
the active layer then go to
Layers...Merge...Merge Down...

Go to Effects...3D Effects...Drop Shadow...
Vertical and Horizontal= -2 (minus 2)
Opacity=50
Blur=5


Step 9.
Open my carryyourheart_text tube, or some Word Art of your own.
Go to Edit...Copy... You can close the tube now.
Go to Edit...Paste as New Layer...
Go to Image... Resize...
and resize by 80%
resample using Bicubic
All layers unticked

Move into position using the Mover Tool
Change the Blend Mode on the layers palette to Overlay

Go to Effects...3D Effects...Drop Shadow...
Vertican and Horizontal= -1 (minus 1)
Opacity=40
Blur=5

image


Step 10.
Go to Layers...Merge...Merge Visible...
Make the Selection Tool active then, Create selection
from layer opaque (the icon is on the Tool Options palette)

Go to Image...Crop to Selection...

Add a new raster layer and drag it below the
merged layer in the layers palette
Flood fill the new layer with white, or if you are going
to place your image on a page with a coloured background
flood fill with the colour of the page.

Here is another example I created using a different tube.

image


I hope you enjoyed this tutorial.
To see my other tutorials click Here


If you wish to contact me you can find an email address to use included on my Site Map
Home