image

Diagonal Background Tutorial

PSP X9

This tutorial was created 2nd August 2008©Copyright Artwork by EssexGirl
please do not copy it, or put it anywhere else without my written permission.

Filters and programs used in this tutorial :-
Paint Shop Pro
Simple - Half Wrap

Supplies:-
A Font of your choice, I used Chopin Script available from DaFont
Gradient and tube I used Here alternatively you can use your own

Some images have been made smaller to shorten file size


Step 1.
Open a new image 300 X 300 transparent
In your Foreground and Stroke Properties box choose Gradient. You can use a gradient of your choice.
I've used one called sg_sweet-pastels, which is in my supplies zip. These are the settings that I used:-
Foreground-Background
Angle=45
Repeats=2
Invert=unticked
Style=Linear

Flood fill your image with the gradient

Go to Effects... Edge Effects... Enhance More...
you won't see a lot of difference, but it makes some of the lines stand out a bit more.

image


Step 2.
Go to Layers...Duplicate...
Image... Mirror... Mirror Horizontal... (Mirror in Older versions)
On the layers palette change the blend mode to Lighten, Darken, Multiply, or overlay
It depends on the gradient that you used and the result that you want.

image

image

Go to Layers...Merge...Merge visible...
Go to Effects...Image Effects...Seamless Tiling...
Use the default setting

image


Step 3.
Use the Pen Tool with these settings
Mode=Draw Lines and Polygons
Connect segments= unticked
Show Nodes= ticked
Create on Vector= ticked
Line Style=Solid
Anti-alias= it doesn't matter if it's ticked, or not
Line Width=1, or 2
Use a foreground colour which will show up against your
background, once the text is in place the line will be hidden

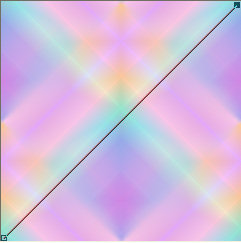
Draw a diagonal line across your image by clicking at the bottom
left corner, then the top right (or you can do it from top left
to bottom right, depending which way you want the text to go).

image

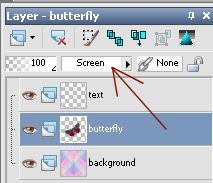
Choose the Text Tool and create as Vector
Change the background on you palette to the colour you want
your text to be (I used white), make the foreground transparent.

Choose the font that you want to use.
I used a font called Chopin Script in size 100 pixels (the size needed
will vary depending on what version of psp you are using, the font
you use and how much text you enter, so you will need to experiment.

Move your cursor close to the middle of the line until you
see the letter A then click on it and type in your text.
Your text should follow your diagonal line. If you highlight your text
(by draging the mouse across it) you can try out different fonts and
font sizes, to see what looks best.
Don't worry if your text isn't quite central

image

On the layers pallete click the little + sign next to the Vector
layer, this will open up the two sub layers containing the text
and the diagonal line. On the sub layer with the line (New Path)
click the eye to hide that layer.

image

That will hide the line under the text.
Go to Layers...Convert to Raster Layer
You could also create more than one line of text like this

image


Step 4.
You could add an inner bevel, to your text or apply something
like an SBP preset, or Eye Candy glass preset.
I just added a drop shadow with these settings
Vertical and Horizontal Offsets = 2
Opacity = 40
Blur = 7

image

My text is not quite in the centre of the image. I left
it like that, but you can use the mover tool to make
your text more central if you want to

Go to Effects...Plugins...Simple...Half Wrap...

image


Step 5.
Open your tube in psp
Go to Edit...Copy...
you can close, the tube now
Back on your main image go to
Edit...Paste as New Layer...
You may need to resize your tube layer and use
the mover tool to reposition it into a space
I added a drop shadow, using the same settings as previously

image

This is another example, the text on this one didn't leave
much space in the centre of the image, for putting the tube,
so I placed it in the space bottom right, then duplicated
it and placed the copy at the top left.

image

Resize if necessary
If you want to make your background tile smaller, you can resize it.
For the background on this page I resized my image by 50% resample using bicubic


Step 6.
As a slight variations try changing the blend mode of the tube layer
in the layer palette. The results will vary depending on the tube and
the gradient colours used, here I changed the blend changed to Screen

image

It gave this pale delicate butterfly, so if you feel like some
experimenting try the different Blend modes to see what happens

image


I hope you enjoyed this tutorial.
To see my other tutorials click Here

If you wish to contact me you can find an email address to use included on my Site Map
Home